In response to a recent client request for a richer browser side UI experience, I took a fresh look at all the recent advances in JavaScript rich client frameworks. The React library stood out as unique, innovative, and impressive.
The main reasons that I like React are:
- It’s a better abstraction than MVC!
- React keeps track of what needs to change in the DOM with its virtual DOM model.
- All the view rendering code can assume that nothing changes during the
rendering process as components recursively call
render(). This makes reasoning about the rendering code much simpler. - The simpler conceptual model of always rendering the entire UI from a given state is akin to the server side rendering of HTML pages, that Rails programmers are more familiar with.
- The documentation is very good, and it’s got significant traction.
Given that React is just about the View part of the client UI, or more specifically, view components, it seems especially suitable for integration into the Rails ecosystem to help build better rich JavaScript UIs. The React website contains a simple tutorial utilizing Node for the backend. Suppose you want to use Rails for the backend?
This following instructions walk you through the steps to build the original simple tutorial with a Rails 4.2 backend utilizing the react-rails gem. With the Rails scaffold generator, very little Rails coding is required. You can try the end result of the completed tutorial on Heroku, and the code on Github.
Since the original React tutorial is excellent, I will not be rehashing any of it’s explanations of how React works. This tutorial purely focusing on converting that tutorial to utilize Rails.
Besides carefully studying the original tutorial, I recommend:
- Watching these 2 videos for an introduction to React’s virtual DOM model. a. This video explains design philosophy of React and why MVC is not the right model for building UIs. b. This video compares ReactJs vs. Key Value Observation(EmberJs) and Dirty Checking (AngularJS).
- Play with the examples on the React overview page. Don’t just read the examples. You can play with the code right on that page!
- Read the docs, which I found fairly interesting.
Useful React Links
- Completed React-Rails tutorial Live on Heroku: Tutorial Live on Heroku.
- Rails 4.2, React, completed tutorial: Github repo for completed tutorial.
- React: A Javascript Library For Building User Interfaces: Main website for React.
- React Tutorial: The Node basis for this tutorial.
- reactjs/react-tutorial: Github repo for official Node based tutorial.
Tutorial Step by Step
Create a brand new Rails 4.2 Application
- Install Ruby 2.1.2 or whichever recent Ruby you prefer. I use rvm.
- Install Rails gem
1gem install rails --preNOTE: There is a bug if you RubyGems versions newer than 2.2.2. This detailed in this question on Stack Overflow.
- Create the Rails app
1rails new react-rails-tutorial cd react-rails-tutorial- Create
.ruby-versionand.ruby-gemsetper your preferences insidereact-rails-tutorialdirectory. - Run bundler
1bundle install - Create new git repository
1git init . - Add and commit all files:
1git add . && git commit -m "rails new react-rails-tutorial"
Create Base Rails App Scaffolding for Comment model
- Run generator. Be sure to use the exact names below to match the React tutorial.
1rails generate scaffold Comment author:string text:text - Migrate the database
1rake db:migrate - Commit
1git add . && git commit -m "Ran rails generate scaffold Comment author:string text:text and rake db:migrate"
Create Page for App
- Run the controller generator
1rails generate controller Pages index - Fix your
config/routes.rbto go to the home page, by changing1get 'pages/index'to
1root 'pages#index'
Try Out the New Rails App
- Start the server
1rails server - Open your browser to http://0.0.0.0:3000 and see the your blank home page.

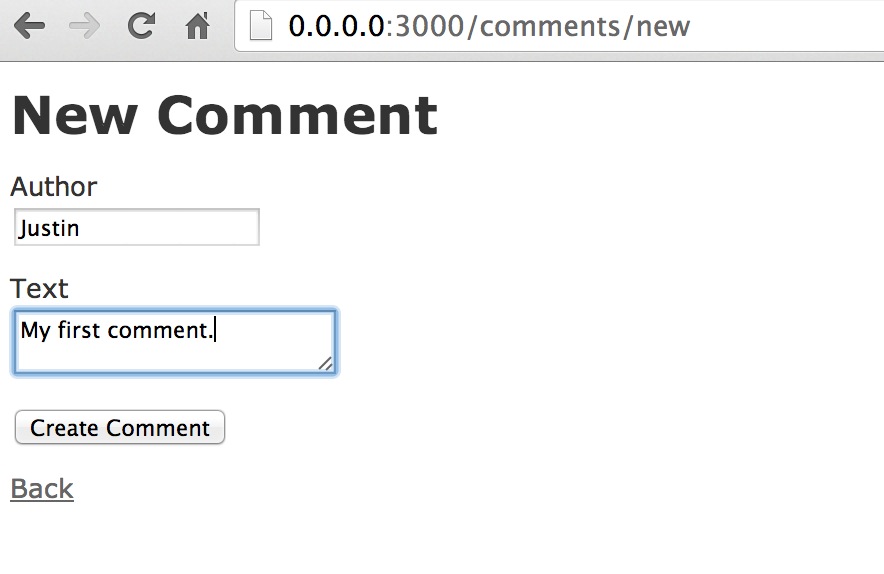
- Open your browser to http://0.0.0.0:3000/comments and see the comments display.
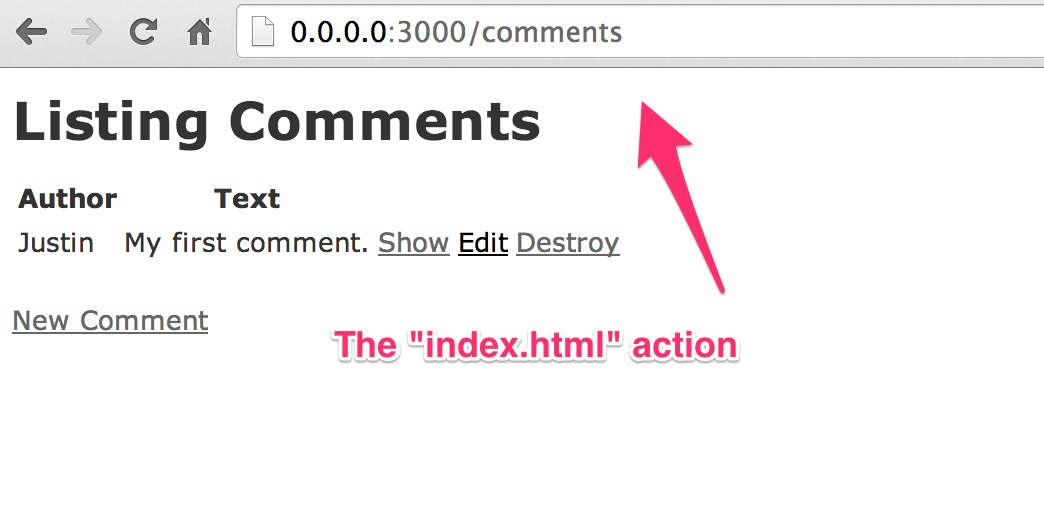
- Add a comment. Click around. Neat!
- Test out the json API, automatically created by Rails:
1curl 0.0.0.0:3000/comments.jsonand see
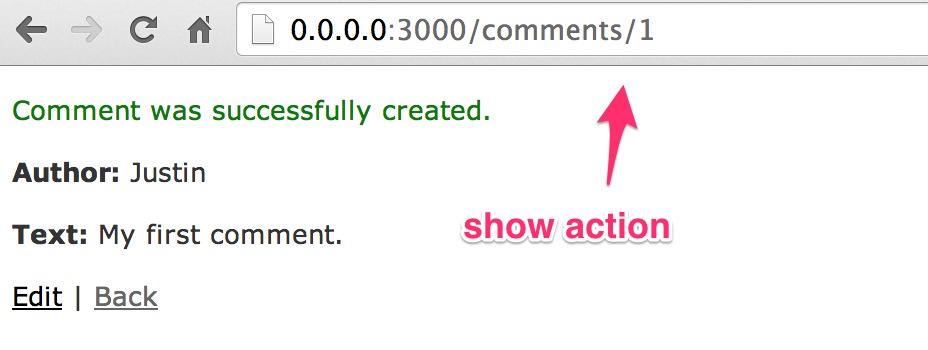
[{"id":1,"author":"Justin","text":"My first comment.","url":"http://0.0.0.0:3000/comments/1.json"}]% - View your routes
> rake routes ✹ ✭ [19:44:29] Prefix Verb URI Pattern Controller#Action root GET / pages#index comments GET /comments(.:format) comments#index POST /comments(.:format) comments#create new_comment GET /comments/new(.:format) comments#new edit_comment GET /comments/:id/edit(.:format) comments#edit comment GET /comments/:id(.:format) comments#show PATCH /comments/:id(.:format) comments#update PUT /comments/:id(.:format) comments#update DELETE /comments/:id(.:format) comments#destroy - If all that worked, then commit your changes
1git add . && git commit -m "Ran rails generate scaffold Comment author:string text:text and rake db:migrate"
React Tutorial Using Node
This is what we’ll be converting to Rails 4.2.
- Create a new branch, in case we want to test the same design with AngularJS
or EmberJS:
1git checkout -b "react" - Take a look at the React Tutorial and the github repo: reactjs/react-tutorial.
- Open up a new shell window. Pick a directory and then do
1git clone git@github.com:reactjs/react-tutorial.git - cd to the
react-tutorial.gitdirectory and open up the source code. - Optionally run the tutorial example per the instructions on the
README.md
Adding React to Rails
- We’ll be using the reactjs/react-rails gem. Plus we’ll need to include the
showdownmarkdown parser, using the showdown-rails gem. Add these lines to your Gemfile and runbundle1 2
gem 'react-rails', github: 'reactjs/react-rails', branch: 'master' gem 'showdown-rails'Note, I’m using the tip of react-rails. Depending on when you try this tutorial, you may not wish to be using the tip, and don’t do that for a production application!
- Per the gem instructions, let’s add the js assets below the
turbolinksreference inapp/assets/javascripts/application.js1 2 3 4 5 6
//= require jquery //= require jquery_ujs //= require turbolinks //= require showdown //= require react //= require_tree . - Once you verify that you can load
0.0.0.0:3000in your browser, then commit the files to git:1git commit -am "Added react-rails and showdown-rails gems"
Move Tutorial Parts to Rails Application
Now the fun starts. Let’s take the parts out of the node tutorial and put them into the Rails app.
- Copy the necessary line from
react-tutorial/index.htmlto replace the contents ofapp/views/pages/index.html.erb. You’ll just have one line there:1<div id="content"></div> - Now, the meat of the tutorial, the JS code. Copy the entire contents of
react-tutorial/scripts/example.jsintoapp/assets/javascripts/comments.js.jsx(Renamed from comments.js.coffee). - Commit the added files, so we can see what we change from the original versions.
1git commit -am "index.html.erb and comments.js.jsx added" - Start the rails server (
rails s). Visit0.0.0.0:3000. Nothing shows up!
Tweak the Tutorial
In the example, the call to load example.js comes after the declaration of the
DOM element with id “content”. So let’s run the renderComponent after the DOM
loads. Wrap the React.renderComponent call at the bottom of comments.js.jsx
like this:
1 2 3 4 5 6 | |
Let’s commit that diff: =git commit -am “React component loads”=
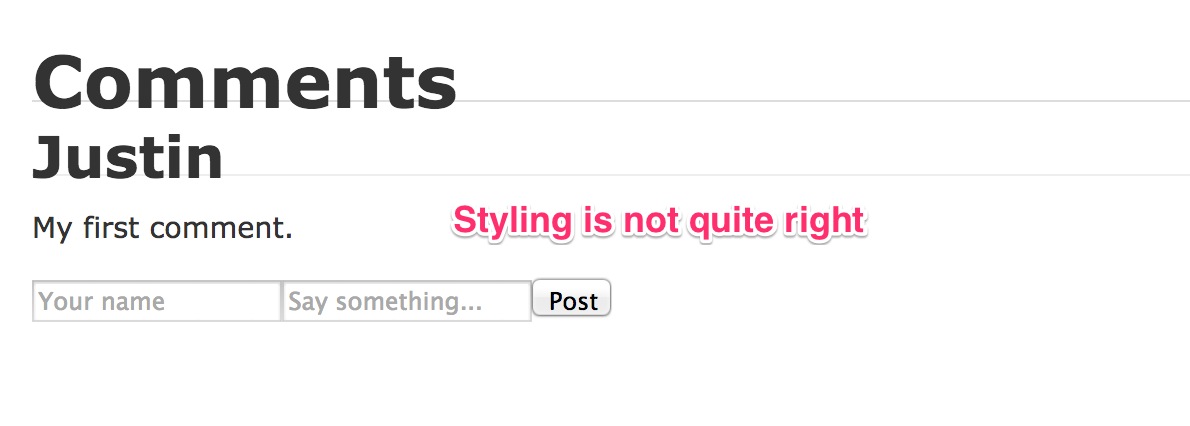
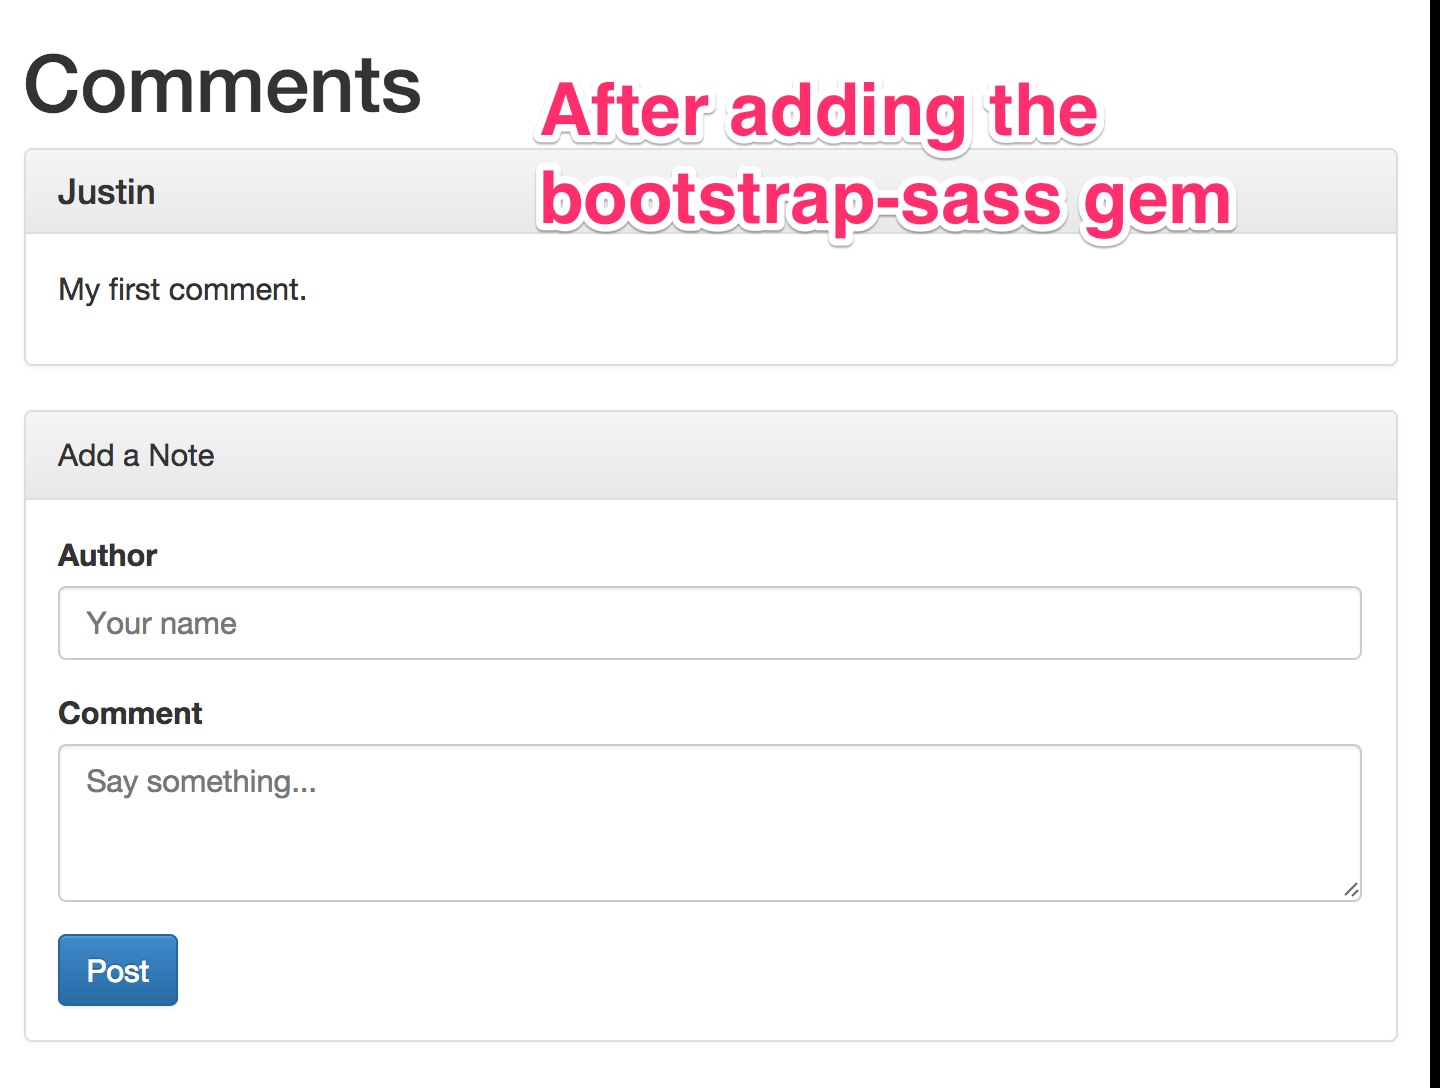
Then copy the css from react-tutorial/css/base.css over to
app/assets/stylesheets/comments.css.scsss
The styling in is not quite right.
Add bootstrap-sass Gem
- Add the gems
1 2
gem 'bootstrap-sass' gem 'autoprefixer-rails' - Run
bundle install - Rename
app/assets/stylesheets/application.csstoapplication.css.scssand change it to the following:1 2
@import "bootstrap-sprockets"; @import "bootstrap"; - Optionally, add this line to
app/assets/javascripts/application.js1//= require bootstrap-sprockets - Restart the application. Notice that there is no padding to the left edge of
the browser window. That’s an easy fix. Let’s put the content div inside a
container, by changing
app/views/pages/index.html.erbto this:1 2 3
<div class="container"> <div id="content"></div> </div> - Let’s spruce up the data entry part. Take a look at the Boostrap docs for CSS
Forms. You’ll have to refer to the diffs on github for this change. Or you
can take creative license here!
Adding Records Fails
The first issue is that we’re not submitting the JSON correctly to add new records.
Started POST "/comments.json" for 127.0.0.1 at 2014-08-22 21:48:55 -1000
Processing by CommentsController#create as JSON
Parameters: {"author"=>"JG", "text"=>"Another **comment**"}
Completed 400 Bad Request in 1ms
ActionController::ParameterMissing (param is missing or the value is empty: comment):
app/controllers/comments_controller.rb:72:in `comment_params'
app/controllers/comments_controller.rb:27:in `create'
If you look at this method in comments_controller.rb, you can see the issue:
1 2 3 | |
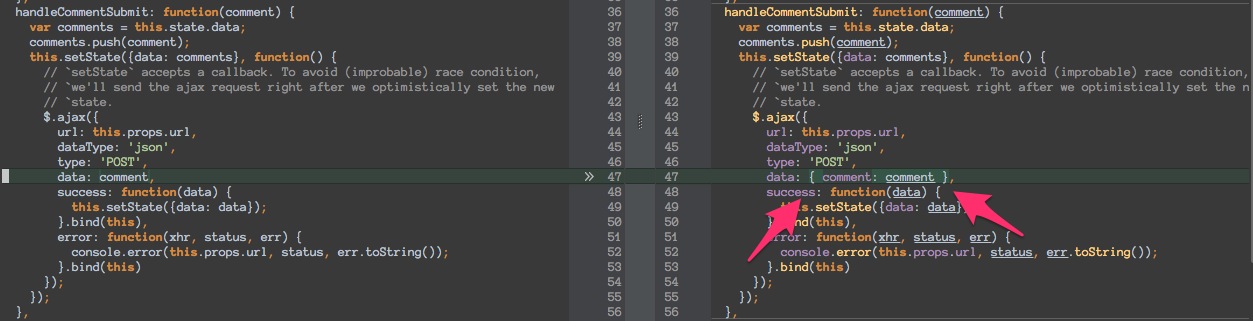
The fix to this is to wrap the params in “comment”, by changing this line in
comments.jsx.js, in function handleCommentSubmit.
1
| |
to
1
| |
Here’s a enlarged view of that diff from RubyMine.
After that change, we can observe this in the console when adding a new record:
Started POST "/comments.json" for 127.0.0.1 at 2014-08-22 21:55:18 -1000
Processing by CommentsController#create as JSON
Parameters: {"comment"=>{"author"=>"JG", "text"=>"Another **comment**"}}
(0.1ms) begin transaction
SQL (0.7ms) INSERT INTO "comments" ("author", "created_at", "text", "updated_at") VALUES (?, ?, ?, ?) [["author", "JG"], ["created_at", "2014-08-23 07:55:18.234473"], ["text", "Another **comment**"], ["updated_at", "2014-08-23 07:55:18.234473"]]
(3.0ms) commit transaction
Rendered comments/show.json.jbuilder (0.7ms)
Completed 201 Created in 22ms (Views: 5.0ms | ActiveRecord: 3.9ms)
When Visiting Other Pages in the App
If you go to the url 0.0.0.0:3000/comments and look at browser console, you’ll
see an error due the page load script looking for a component of id content
that doesn’t exist. Let’s fix that by checking that the DIV with id content
exists before calling React.renderComponent.
1 2 3 4 5 6 7 8 9 | |
Deploying to Heroku
It’s necessary to make a couple changes to the Gemfile. Use pg in production
and add the rails_12factor gem.
1 2 3 4 | |
Turbolinks
If you’re going to have other pages in the application, it’s necessary to change
when React.renderComponent is called, switching from document “ready” event to
to the document “page:change” event. You can find more details at
the Turbolinks Gem repo.
1 2 3 4 5 6 7 8 9 | |